Grammarly reports more than 30 million people use its product every day, and yet a single misplaced comma in a client proposal can still cost a deal, which is why proofreading tools are judged on the errors they catch, not on the size of their user base. That is the question this guide answers with the best ai proofreading tools, tested on price, features, and real use rather than on marketing claims.
This guide compares 10 tools that writers actually use in 2026, judged on what the work needs, not on a feature count. Prices here come from vendor pages and comparisons checked in late 2026, so check the vendor pricing page before committing, because pricing and plan limits change often. The rule that runs through the whole guide is simple. A tool that fits your real workload is worth more than a tool with a longer feature list.
The tools differ in one decisive way. Some are built for speed, some for control, and some for safety, and your choice should follow which of those jobs your work actually needs. A buyer who picks on price alone will often pay twice, once for the cheap tool and once for the tool that finally does the job. Read the at a glance table first, then the detail sections for the two or three tools that fit your job.
Why Proofreading Is Not Spellcheck
Spellcheck catches words that do not exist. Proofreading catches words that exist but are wrong, such as their and there, affect and effect, and a missing comma that changes the meaning of a sentence. The tools in this guide are judged on that harder job, not on red underlines.
The second job is tone. A proofreader that only fixes grammar leaves a stiff formal email untouched, while a good tool also flags wordiness, passive voice, and a tone that does not match the reader. That is the difference between a clean draft and a draft that actually lands.
The third job is consistency across a team. A company that publishes in five voices looks careless, and a style guide enforced by a proofreading tool keeps every document on the same standard. That is why the best tools in this guide include team style guides, not just personal corrections.
The 10 AI Proofreading Tools at a Glance
| Tool | Main job | Best for | Starting paid price |
|---|---|---|---|
| Grammarly | Grammar, tone, and clarity | Everyday professional writing | Free, Premium from about 12 dollars a month |
| ProWritingAid | Deep style and long form reports | Authors and long form writers | Free, paid from about 20 dollars a month |
| Hemingway Editor | Clarity and readability | Cutting wordy writing | Free in the browser, desktop app about 20 dollars one time |
| QuillBot | Paraphrasing and grammar | Rewriting and polishing | Free, Premium from about 10 dollars a month |
| LanguageTool | Multilingual grammar checking | Writers in many languages | Free, Premium from about 5 dollars a month |
| Ginger | Grammar and translation | Non native English writers | Free, Premium from about 14 dollars a month |
| Sapling | Grammar and autocomplete | Support teams and sales reps | Free, Pro from about 25 dollars a month |
| Writer | Team style guides and AI writing | Companies with a brand voice | Free, Team from about 18 dollars a month |
| Trinka | Academic grammar and style | Researchers and academics | Free, Premium from about 8 dollars a month |
| Wordtune | Rewriting and tone | Polishing drafts fast | Free, Plus from about 10 dollars a month |
The best ai proofreading tools cannot be picked from this table alone, because the right answer for most buyers is a shortlist of two or three tools, not one winner. Use the table to cut the list down, then read the detail sections for the tools that survive the cut. A tool that looks cheap in this table can cost more at your real volume, and a tool that looks dear can be the cheapest once you count the hours it saves.
Free tiers help with testing. Most tools in this guide offer a free tier or a trial, enough to test the tool on your real work before paying. Paid plans grant commercial rights on most tools, but the details differ, so read the licence for the plan you buy before you use the output in work you sell or publish.
Best Pick by Job
| Job type | First pick | Second tool | Why this pair works |
|---|---|---|---|
| Everyday work | Grammarly | Hemingway Editor | Grammar, tone, and clarity plus clarity and readability covers the job end to end |
| Tight budget | ProWritingAid | QuillBot | Deep style and long form reports plus paraphrasing and grammar covers the job end to end |
| Heavy volume | Hemingway Editor | LanguageTool | Clarity and readability plus multilingual grammar checking covers the job end to end |
| Team use | QuillBot | Ginger | Paraphrasing and grammar plus grammar and translation covers the job end to end |
| Quality first | LanguageTool | Sapling | Multilingual grammar checking plus grammar and autocomplete covers the job end to end |
| Fast start | Ginger | Writer | Grammar and translation plus team style guides and ai writing covers the job end to end |
A buyer using the best ai proofreading tools needs to match the tool to the job, not to the ranking. The first pick in each row is the tool that does that job best on its own, and the second tool covers the weakness of the first. Together they cover the two jobs that decide whether the work ships on time and to a good standard.
Start with the row that matches your week. If your week is mostly one kind of job, buy the first pick in that row and test the second tool on the free tier. If your week mixes several jobs, pick the tool that appears most often across the rows, because that is the tool that fits your real workload rather than one ideal day.
How to Judge the Best AI Proofreading Tools
Start with your real work, not with a demo. Take three examples from your own week, run them through three tools, and judge the results on the criteria that matter for your job. A tool that wins on a demo can still fail on your work, and a tool that looks plain in a demo can be the one that holds up when the deadline is real.
When you test the best ai proofreading tools, score each tool on the same three examples and write the scores down. Does the output need heavy editing. Does the tool handle your hardest example, not just your easiest one. And does the price cover your real volume, not just a quiet week. A tool that passes all three on your examples is the right tool, even if it loses on a general ranking.
Then test the workflow you will actually use. Run the tool inside your normal process, from brief to finished work, and time each step. A tool that makes beautiful output in a format your team cannot use is a problem, not a solution. Check file formats, export options, and sharing before you buy, because a tool that cannot hand off cleanly will cost hours every week.
Finally, model the monthly cost at your real volume. A quiet week tells you nothing about the bill. Work out how many jobs you do in a busy month, how many credits or seats each job needs, and what the plan costs at that volume. Buy the plan that covers your busiest month with a small margin, and keep the free tier for testing new ideas.
The 10 AI Proofreading Tools in Detail
1. Grammarly
Grammarly is the most widely used proofreading tool, and it works in the browser, in email, and in documents through extensions and apps. It checks grammar, spelling, tone, and clarity, and explains each suggestion so the writer learns as they go.
Pricing starts free, and Premium costs about 12 dollars a month billed yearly, with Business plans for teams. It fits almost every writer. The trade off is less depth on long form style than ProWritingAid.
Test the tone detector on your real emails, because tone is the feature that separates Grammarly from a spellchecker.
2. ProWritingAid
ProWritingAid offers the deepest style reports in this guide, covering pacing, repeated words, dialogue tags, and sentence variety. It is built for long form writers who want to improve, not just to fix errors.
Pricing starts free with limited reports, and paid plans start at about 20 dollars a month. It fits authors and thesis writers. The trade off is a busier interface and slower checks on long documents.
Run the full report on a finished chapter, because the style insights only show on long text.
3. Hemingway Editor
Hemingway Editor highlights long sentences, passive voice, and hard to read passages, and grades the text for readability. It is the simplest tool here, and the best pick for cutting wordy drafts down to clear prose.
Pricing is free in the browser, and the desktop app costs about 20 dollars one time. It fits writers who overwrite. The trade off is no grammar checking, so pair it with Grammarly.
Paste a finished draft in and cut every highlighted sentence by a third before you publish.
4. QuillBot
QuillBot combines a grammar checker with a paraphraser that rewrites sentences in several modes, from formal to fluent. It also adds a summariser and a citation tool, which makes it useful for students and researchers.
Pricing starts free, and Premium costs about 10 dollars a month billed yearly. It fits writers who rewrite as much as they proofread. The trade off is lighter grammar depth than Grammarly.
Use the formal mode on client emails and the fluent mode on creative drafts, because each mode suits a different job.
5. LanguageTool
LanguageTool checks grammar in more than 30 languages, which makes it the best pick for multilingual writers and teams. It works in the browser, in documents, and through an API for teams that need checks inside their own tools.
Pricing starts free, and Premium costs about 5 dollars a month billed yearly. It fits multilingual teams and budget writers. The trade off is less tone help than Grammarly.
Test it in your second language first, because that is where its advantage shows.
6. Ginger
Ginger checks grammar and spelling and adds translation and a sentence rephraser for non native English writers. It is built for writers who think in another language and write in English.
Pricing starts free, and Premium costs about 14 dollars a month. It fits non native speakers. The trade off is a smaller feature set than Grammarly.
Use the rephraser on sentences you are unsure about, because it shows how a native speaker would write them.
7. Sapling
Sapling offers grammar checking plus autocomplete and snippets for support teams and sales reps who write the same replies often. It learns team phrasing and suggests whole replies, which saves time on repetitive writing.
Pricing starts free, and Pro costs about 25 dollars a month. It fits support and sales teams. The trade off is less use for long form writers.
Set up snippets for your ten most common replies first, because that is where the time saving sits.
8. Writer
Writer enforces a team style guide, checking every document against the company voice, terms, and banned phrases. It adds AI writing that follows the same guide, so new writers sound like the brand from day one.
Pricing starts free, and Team plans start at about 18 dollars a month per user. It fits companies with a clear brand voice. The trade off is setup time to build the style guide.
Write the style guide before you invite the team, because the tool is only as good as the guide.
9. Trinka
Trinka is trained on academic text and checks formal tone, consistency, and journal style for researchers. It adds a plagiarism check and a citation tool that suit academic publishing.
Pricing starts free, and Premium costs about 8 dollars a month billed yearly. It fits academics and thesis writers. The trade off is less use for casual or marketing writing.
Run it on a finished paper before submission, because journal style checks only show on full text.
10. Wordtune
Wordtune rewrites sentences in different tones, from casual to formal, and suggests clearer versions of wordy drafts. It works as a browser extension and a document editor, so it fits into most writing workflows.
Pricing starts free with limited rewrites, and Plus costs about 10 dollars a month. It fits writers who polish drafts fast. The trade off is lighter grammar checking than Grammarly.
Rewrite the opening paragraph first, because that is the paragraph readers judge.
Your One Week Test for Proofreading Tools
Day one is for setup. Create accounts on your top three tools, set the same test examples in each, and write down what good looks like before you see any output. A test without a written standard will drift toward whichever tool has the prettiest demo, and that is not a test at all.
Days two to four are for real work. Run your actual jobs through each tool, not sample tasks, and keep a note of the time each job takes and the editing each output needs. The tool that saves time on your real work is the tool to buy, even if another tool wins on a single example.
Day five is for the decision. Compare the notes, check the monthly cost at your real volume, and pick the tool that did best across the week rather than the tool that did best on one day. Then cancel the trials you did not pick, so you are not paying for tools you tested once and forgot.
What Proofreading Costs at Real Volume
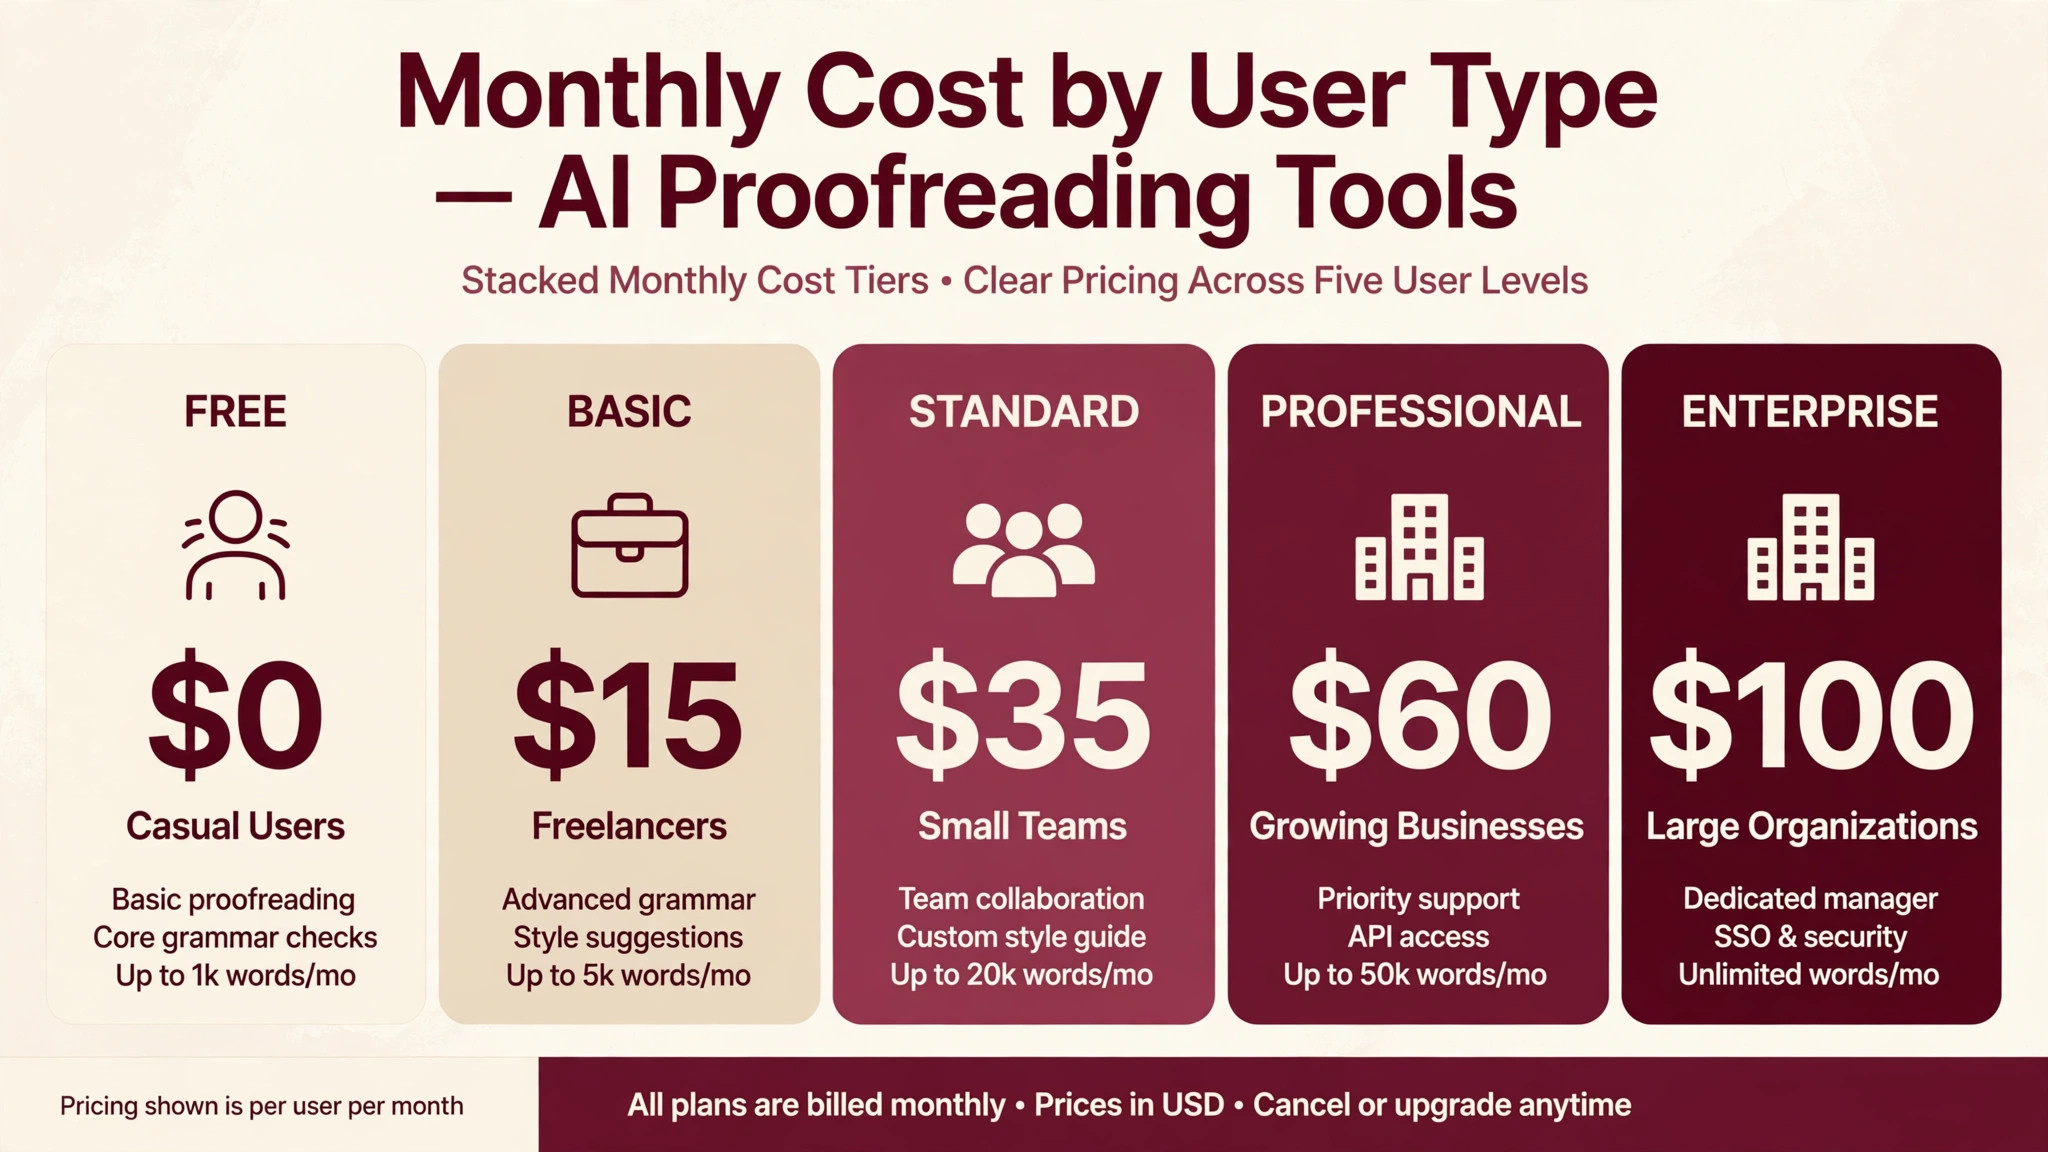
| User type | Monthly volume | Tool stack | Monthly cost |
|---|---|---|---|
| Hobbyist, testing an idea | Low | Grammarly free tier | 0 dollars |
| Solo worker, steady use | Medium | Grammarly paid plan | About 15 dollars |
| Small team, daily use | High | Grammarly plus ProWritingAid | About 35 dollars |
| Growing team, heavy use | Very high | ProWritingAid plus Hemingway Editor | About 60 dollars |
| Large team, full volume | Top volume | Grammarly plus Hemingway Editor team plan | About 100 dollars |
A hobbyist can test the idea for nothing, using free tiers across the tools in this guide, and that is the right way to start. The best ai proofreading tools are cheapest when you test free first and only pay for the tool that proves itself on your work, because a paid plan bought on a demo is often the most expensive mistake in this category.
A solo worker on a steady schedule pays about 15 dollars a month for one paid plan, which covers daily use with room to spare. A small team that uses the tools every day pays about 35 dollars for two tools that cover different jobs, and that pair is usually better value than one dear tool that does half the work well.
A growing team pays about 60 dollars for a heavier stack, and a large team pays about 100 dollars for team plans with shared seats and admin controls. The stack is what you actually pay for, not the single subscription, so work out the stack cost before you compare headline prices. Check the vendor pricing page before you commit, because prices change often.
How This Guide Ranked the Proofreading Tools
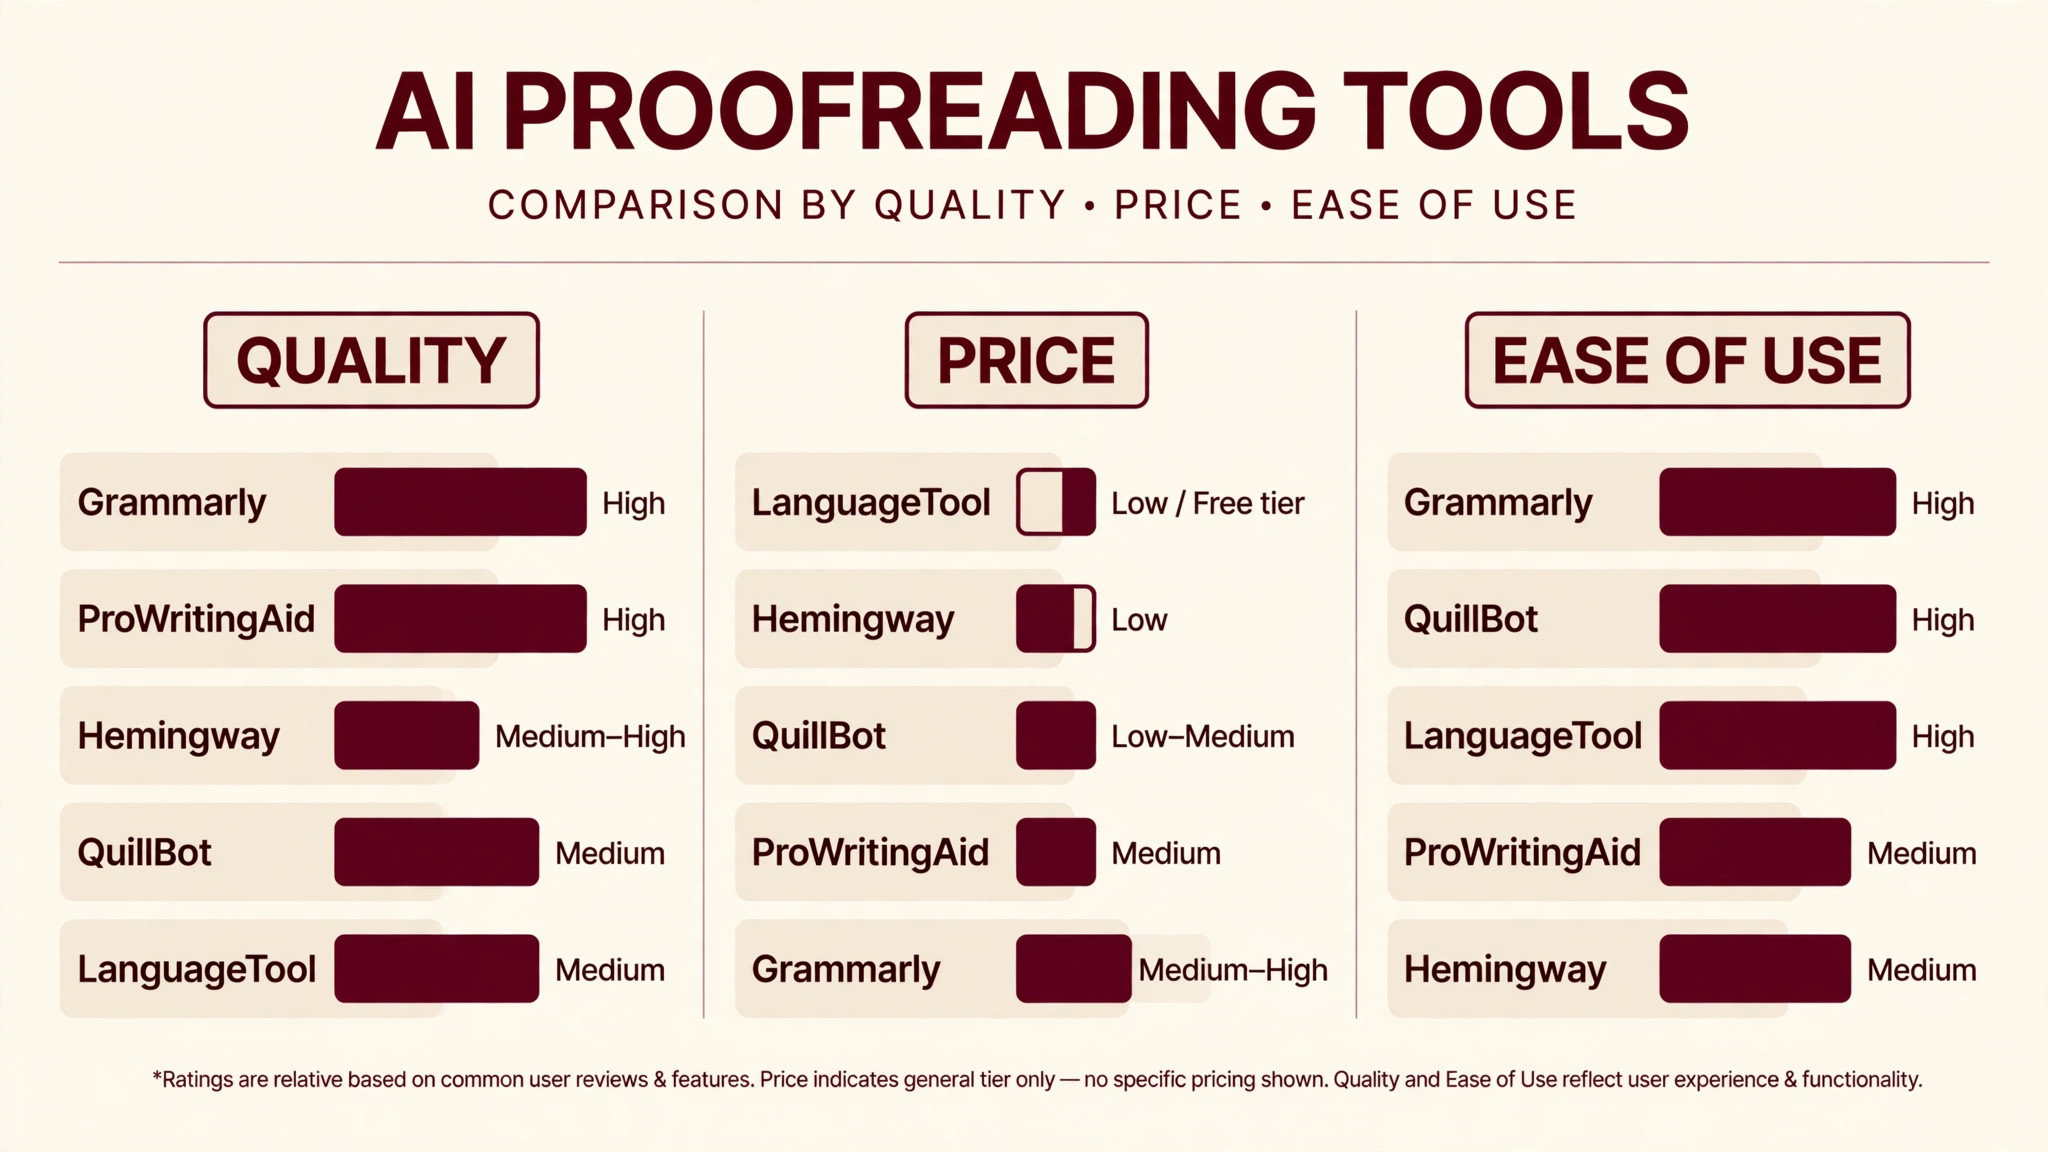
Every tool in this guide was judged on the same four tests. The first test was output quality on real work, not on vendor demos. The second test was ease of use, including setup time and how fast a new user can get a good result. The third test was pricing at real volume, including free tier limits and the cost of the plan a busy user actually needs.
The fourth test was trust, including commercial rights, data handling, and how the tool treats your work. A tool that scored well on output but poorly on trust was ranked below a tool that scored well on both, because a tool you cannot trust with client work is a tool you cannot use. No vendor paid for a place in this guide, and no ranking was sold.
Field Notes on the Proofreading Tools
A buyer who tests three tools side by side learns more in one afternoon than a buyer who reads ten reviews. Set the same task in each tool, run it the same way, and compare the results on the same sheet of paper. The differences that matter will show up fast, and the differences that do not matter will fade. Keep the sheet, because it is the evidence behind the decision you will defend to your team.
Pricing pages change often, and a price quoted in a review can be out of date within a month. Before you buy, open the vendor pricing page and check the plan limits, the renewal price, and the cancellation terms. A plan that looks cheap on a monthly price can cost more on annual billing, and a plan that looks dear can include the feature that saves you a second subscription.
The workflow around the tool matters as much as the tool itself. A tool that fits your existing process will be used every day, while a tool that needs a new process will be used for a week and then forgotten. Map the steps from brief to finished work, name the tool that does each step, and check that the handoff between steps is clean before you commit to a purchase.
Support quality is easy to overlook and hard to fix later. A tool with fast, helpful support will save you hours when something breaks, while a tool with slow support will leave you stuck on a deadline. Test support before you buy by sending one real question and timing the answer. The reply you get is a fair preview of the support you will get as a paying customer.
Team adoption decides whether a tool pays off. A tool that one person loves and the rest of the team ignores is a cost, not a saving. Involve the team in the test week, ask each person to run one real job through the tool, and collect their notes before you decide. A tool the team chooses together will be used, and a tool imposed from above will be worked around.
What the Free Tier Covers for Proofreading Tools
The free tier is a test, not a plan, and it should be judged as one. Most free tiers in this guide cover a useful amount of real work, from a handful of jobs a month to a daily allowance that suits a solo worker. The limit that matters is the one you hit first, whether that is a word count, a credit balance, or a seat count, and that limit decides how long the free tier lasts.
A free tier that covers your test week is worth more than a free tier that covers a month of light use but blocks the one feature you need. Check three things before you rely on it. Does it include the feature you are testing. Does it allow commercial use of the output. And does it export in the format you need. A free tier that fails any of those three is a demo, not a trial.
When the free tier runs out, the decision is simple. If the tool proved itself on your real work, pay for the cheapest plan that covers your volume and keep the free tier of the second tool for testing new ideas. If the tool did not prove itself, cancel and move on. The worst outcome is paying for a tool you tested once, so set a reminder to cancel every trial on the day you start it.
Mistakes Writers Make With Proofreading Tools
The first mistake is buying on price alone. The best ai proofreading tools vary widely in what the headline price buys, and the cheapest plan often has limits that force an upgrade in the first month. Work out the cost at your real volume before you buy, and compare the plan you will actually need, not the plan on the pricing page hero section.
The second mistake is trusting the output without checking it. AI tools make mistakes that look confident, from invented facts to garbled text, and a buyer who publishes without reading will ship errors under their own name. Read every output before you use it, and check the parts that matter most, because the tool will not tell you where it guessed.
The third mistake is buying a tool and never learning it. Most tools in this guide have features that only show after a week of real use, from templates to shortcuts to integrations, and a buyer who quits after one day judges the tool on its worst hour. Give each tool a full week on real work before you decide, and keep notes so the decision is based on evidence.

Your Proofreading Setup Checklist
Use this checklist when you set up your pick from the tools in this guide, and keep a copy with your project notes.
- Define the one job the tool must do for writers before you open any pricing page.
- Pick your top three tools from the at a glance table and test them on the same three real examples.
- Check the commercial licence for the plan you will buy, not the free plan.
- Set up your workflow end to end, from brief to finished work, and time it on real jobs.
- Work out the monthly cost at your busiest volume and buy the plan that covers it.
- Train the tool on your own examples and templates before you use it on client work.
- Check every output before you publish or send it, and fix the errors the tool missed.
- Review the results after one month, and switch tools if the notes show a better fit.
Related Guides
Keep exploring with these guides on Stratilyze:
- Best AI Tools for Editors (6 Tools)
- Best AI Tools for Thesis Writing (8 Tools)
- Edit Academic Essays with Grammarly
Frequently Asked Questions
Which AI proofreading tool is best for professional writers?
Grammarly is the best pick for most professional writers because it works everywhere, from email to documents, and catches grammar, tone, and clarity issues in one pass. ProWritingAid is the better pick for long form writers who want deep style reports. That is how the best ai proofreading tools should be judged for your team, on your real work rather than on a ranking.
Is Grammarly or ProWritingAid better for proofreading a book?
ProWritingAid is better for a book because it offers long form reports on pacing, repeated words, dialogue, and style that Grammarly does not match. Grammarly is better for everyday writing, email, and short documents where speed matters more than depth.
Can AI proofreading tools replace a human proofreader?
No, AI tools catch most grammar and spelling errors, but they miss context, facts, and nuance that a human proofreader catches. Use AI for the first pass and a human for the final pass on anything that affects money, grades, or reputation.
What is the best free AI proofreading tool?
LanguageTool is the best free pick because its free tier covers grammar in many languages with no account needed for basic checks. Hemingway Editor is also free in the browser and is the best pick for cutting wordy sentences. The best ai proofreading tools differ most on this point, so test it on your own workload before you commit.
Do proofreading tools work for non native English speakers?
Yes, and they are most useful for non native speakers, because they catch articles, prepositions, and verb forms that are hard to learn by ear. Grammarly and LanguageTool both offer clear explanations with each correction, which helps the writer learn as they go.
Which proofreading tool is best for academic writing?
Trinka is the best pick for academic writing because it is trained on academic text and checks formal tone, consistency, and journal style. ProWritingAid is the better pick for a thesis that also needs style reports and long form structure help.
The Proofreader to Pick This Week
The pick is Grammarly. If you want the best ai proofreading tools to pay off, start there, test it on your real work for a week, and only then decide whether you need a second tool. Grammarly wins because it does the core job well, it is easy to start, and its price fits a solo worker as well as a team.
Whichever tool you choose, test it on your own examples, check every output before you use it, and model the cost at your busiest month. A tool earns its fee in work that ships on time, to a good standard, and at a price you can defend. Choose the tool that does those three jobs on your busiest week, and the rest of the feature list will take care of itself.