

Your WordPress site loads slowly on a busy afternoon, the HostGator renewal bill arrives at five times the intro price, and support tells you the site is using too much of a shared server that you never chose to share. That is the moment most owners start asking how to switch from hostgator to cloudways for wordpress hosting. The move is one of the most common hosting migrations in WordPress, because the two platforms sit at opposite ends of the market. One sells cheap shared hosting with renewal jumps. The other sells managed cloud servers with flat monthly pricing.
This guide walks through the full switch in eight steps, from backup to DNS cutover, with real prices, real limits, and the mistakes that cause downtime. Prices here come from vendor pages and 2026 comparisons, so check the vendor page before committing, because hosting prices and trial terms change often. The move itself costs nothing when you use the free migrator plugin, and the first managed migration is free as well.
The two hosts differ in one decisive way. HostGator puts your site on a shared server with capped resources, so a traffic spike or a busy neighbour slows you down. Cloudways puts your site on a dedicated cloud server from DigitalOcean, Vultr, Linode, AWS, or Google Cloud, with managed caching, staging, and backups included. Your choice should follow whether your site has outgrown shared hosting, not whether the intro price looks attractive.
Why Site Owners Leave HostGator
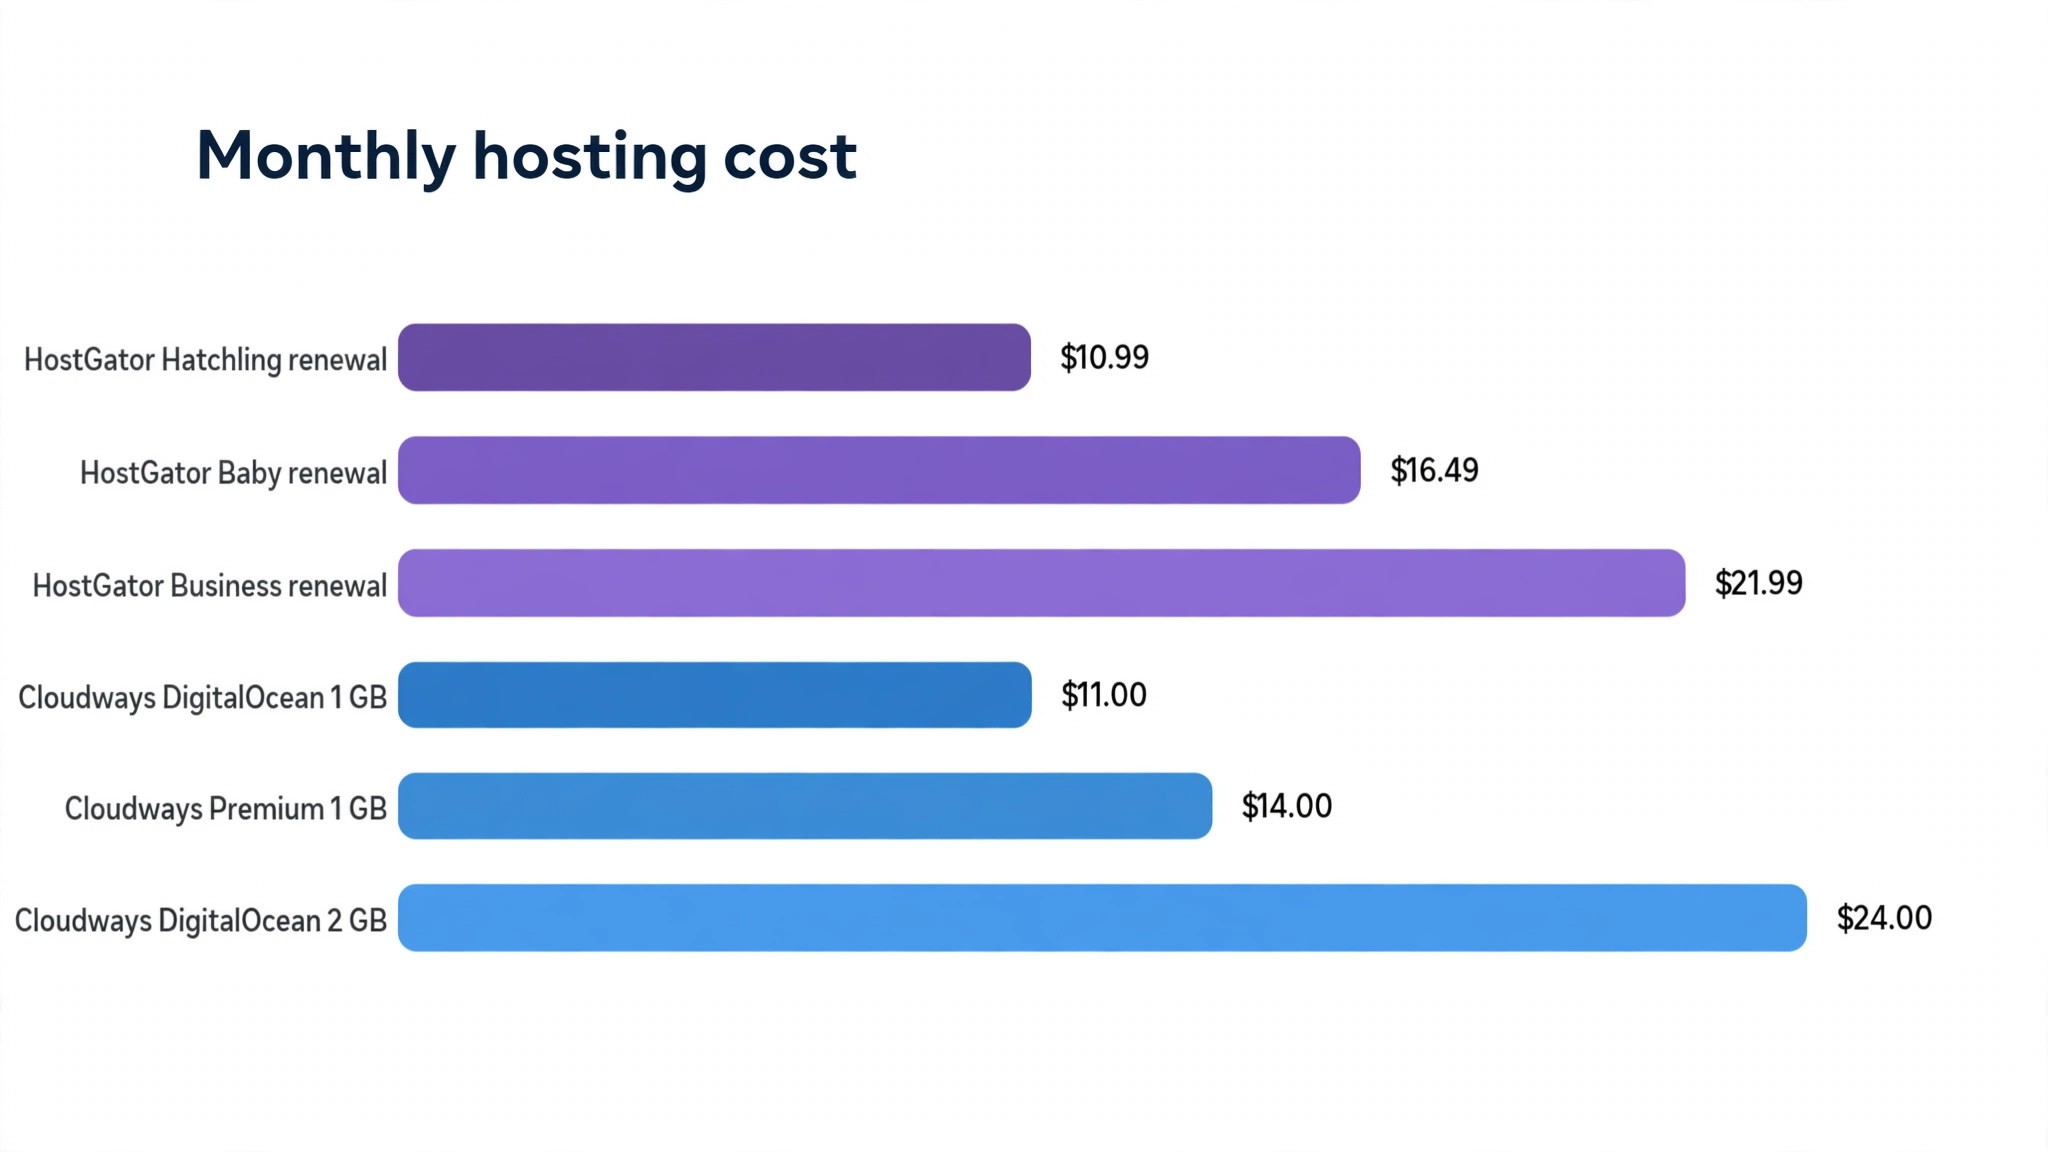
HostGator hooks owners with a 3 dollar and 75 cent intro price, then renews at up to five times that rate on ageing shared servers. The renewal prices run near 10 dollars and 99 cents a month for Hatchling, 16 dollars and 49 cents for Baby, and 21 dollars and 99 cents for Business, which means a site that started cheap can cost more than a cloud server within a year. That renewal jump is the single biggest reason owners move, because the price rises while the performance stays the same.
Shared limits are the second reason, and they explain why so many owners research how to switch from hostgator to cloudways for wordpress hosting in the first place. HostGator caps shared plans at 25 percent of a single CPU core, so a site with real traffic hits a ceiling that no caching plugin can fix. Pages slow down, admin tasks time out, and support blames plugins that were never the problem. A site that outgrows shared hosting needs dedicated resources, and Cloudways provides them from 11 dollars a month with no renewal jump at all.
The third reason is support and control. Cloudways offers staging environments, free SSL, automated backups, and 24 hour human support on a platform built for WordPress, WooCommerce, Magento, and Laravel. HostGator support covers cPanel sites on shared servers, which is fine for a small brochure site and thin for a growing store. Owners who manage their own backups, staging, and performance on HostGator find that Cloudways includes those jobs in the monthly price.
A fourth reason applies to stores. WooCommerce needs more resources than a blog, since every cart page and checkout is dynamic and cannot be cached the same way. A shared plan that handles a brochure site will slow a store at the exact moment customers are paying. Cloudways gives a store dedicated RAM and Redis object caching, which keeps checkout fast under load. Store owners who watch conversion rates notice the difference quickly, since a slow checkout loses sales that no discount can win back.
HostGator vs Cloudways at a Glance
| Area | HostGator | Cloudways |
|---|---|---|
| Hosting type | Shared, cPanel based | Managed cloud, dedicated resources |
| Starting price | 3 dollars and 75 cents intro | 11 dollars a month, DigitalOcean Standard 1 GB |
| Renewal price | Up to 5 times intro, Baby near 16 dollars and 49 cents | Flat, no renewal jump |
| Server resources | Capped at 25 percent of one CPU core | 1 GB RAM, 1 core, 25 GB SSD at entry |
| Free migration | 149 dollars and 99 cents per site | Free migrator plugin, first managed migration free |
| Email hosting | Included on shared plans | Not included, Rackspace add-on |
| Domain registration | Included on some plans | Not offered, use a registrar |
| Free trial | None standard | 3 days, no credit card required |
Learning how to switch from hostgator to cloudways for wordpress hosting starts with understanding what changes and what stays the same. Your WordPress content, theme, plugins, and database move across unchanged. Your email and domain registration do not move, because Cloudways does not offer them, so you need a separate email provider and registrar before the move. Your DNS records move with you, and you update them at the registrar when the new site is ready. Nothing about the move requires a developer, but the email and domain details catch more owners than the migration itself.
What the Move Really Costs
The migration itself costs nothing. The Cloudways WordPress Migrator plugin is free and unlimited for WordPress and WooCommerce sites, and the first managed migration by Cloudways engineers is free as well. HostGator charges 149 dollars and 99 cents per site for its own migration service, so doing the move yourself with the free plugin saves that fee immediately. The only cost is the new server, which starts at 11 dollars a month for DigitalOcean Standard with 1 GB of RAM, 25 GB of SSD, and 1 TB of bandwidth.
Server sizing decides the monthly bill. The 1 GB plan at 11 dollars a month suits a low traffic site or a staging copy. The 2 GB plan at 24 dollars a month handles a moderate traffic WordPress site comfortably. DigitalOcean Premium with NVMe storage starts at 14 dollars a month for 1 GB, and AWS and Google Cloud plans start near 36 dollars a month for small instances. Cloudways bills pay as you go with no contract, so you can scale the server up or delete it at any time.
The hidden costs sit outside the server price, and they are part of the real answer to how to switch from hostgator to cloudways for wordpress hosting without surprises. Email needs a separate provider, since Cloudways offers no email hosting and sells Rackspace email as a paid add-on.
Bandwidth beyond your allowance, off-site backups, and add-ons are billed on top of the base plan, so a busy site should check its transfer usage before choosing the smallest server. A site that pays 16 dollars and 49 cents on HostGator Baby renewal and moves to an 11 dollar Cloudways server saves money and gains dedicated resources, which is why the move pays for itself in the first month for most owners.
How to Switch from HostGator to Cloudways for WordPress Hosting in 8 Steps
Follow these eight steps in order, and do not change DNS until step seven. The whole move takes a few hours for a standard site, plus a day of testing before cutover.

Step 1. Back Up Everything on HostGator
Take a full backup before touching anything. Export the WordPress database from phpMyAdmin or a backup plugin, download the wp-content folder through cPanel file manager or FTP, and save a copy of the site on your own computer. Confirm the backup contains the database file and the uploads folder, since those two parts hold everything that matters. A backup you never test is a hope, not a plan, so note the file sizes and confirm the download completed without errors.
Step 2. Choose Your Cloudways Server Size
Sign up for the free 3 day trial, which needs no credit card, and choose a server. DigitalOcean Standard 1 GB at 11 dollars a month is the right start for a small site, while a store or a busy blog should start at 2 GB and 24 dollars a month. Pick a server location near your visitors, since distance adds latency to every page load. You can scale the server later without moving the site again, so starting small is safe.
Step 3. Launch a Blank WordPress App on Cloudways
Create a new WordPress application on the Cloudways server, and let the platform install a clean copy. Note the temporary staging URL and the application credentials, since the migrator plugin will need them. Do not install your theme or plugins on this blank copy, because the migration will overwrite it with your real site. The blank app is only a target for the copy, and it takes a few minutes to launch.
Step 4. Install the Cloudways Migrator Plugin on HostGator
Log in to your HostGator WordPress admin, install the free Cloudways WordPress Migrator plugin, and open it. Enter the destination details from the Cloudways application, including the server address and the migration key, and let the plugin connect to the new server. The plugin works with WordPress and WooCommerce sites, and it handles the database, files, and settings in one run. If the plugin cannot connect, check that HostGator has not blocked outgoing connections, and try again before moving to a manual migration.
Step 5. Run the Migration and Watch for Errors
Start the migration and let it run without closing the browser tab. A small site finishes in minutes, while a large site with many images can take an hour or more. Watch the progress screen for errors on large files or database tables, and note any file that fails to copy. When the run finishes, the plugin reports success or lists the files that need a second pass. Run the migration a second time if anything failed, since the plugin overwrites the target cleanly.
Step 6. Test the Copy Before Anyone Sees It
Test the migrated site on its temporary Cloudways URL before changing DNS. Click through the homepage, a blog post, the contact form, and the checkout if you run a store. Log in to the admin, check that plugins are active, and confirm that images load. Use a hosts file entry to preview the site under its real domain name, which catches mixed content and hardcoded URL problems that the temporary URL hides. Fix every broken link now, because after DNS changes, visitors will see the same problems.
Step 7. Update DNS and Go Live
Point the domain to Cloudways by updating the A records at your domain registrar to the new server IP address. Set the TTL low a day before the change, so the old records expire quickly and visitors reach the new server sooner. DNS changes spread across the internet over a few hours, and during that window some visitors see the old site and some see the new one. Do not edit content on either copy during the switch, since edits made on the old site after the copy will be lost.
Step 8. Cancel HostGator and Clean Up
Wait at least a week after the DNS change before cancelling HostGator, and keep the old backup for a month. Confirm that email still works, that the SSL certificate is active on Cloudways, and that backups are running on the new server. Then cancel the HostGator plan, remove the migrator plugin from the live site, and delete the old staging app if you created one. A clean cancellation ends the renewal billing that pushed you to move in the first place.
DNS and Email After the Move
DNS is the part of the move that causes the most confusion, because it sits outside both hosts. Your domain lives at a registrar, and the A record tells visitors which server holds your site. After migration, you change that record to the Cloudways server IP, and the change spreads over a few hours. Lowering the TTL to 300 seconds a day before the change makes the old record expire faster, so visitors reach the new server sooner and the mixed window shrinks.
Email needs a plan before the move, not after it. Cloudways does not host email, so a mailbox that lived on HostGator will stop working when you cancel the old plan. Move email to Google Workspace, Microsoft 365, or the Rackspace add-on that Cloudways sells, and update the MX records at your registrar before cancelling HostGator. Test sending and receiving from the new mailbox while the old one still works, since a missed MX record means lost mail that nobody notices for days.
SSL also needs a check after cutover. Cloudways provides a free SSL certificate, and you should confirm it is active on the live domain within an hour of the DNS change. A site that loads over plain HTTP after the move will lose visitors and search rankings, so check the padlock in a browser and fix any mixed content warnings by updating hardcoded HTTP links in the database. The migrator plugin handles most URL changes, but a manual check catches the rest.
One more DNS detail deserves a note, because it confuses owners who check the site from home. Your own computer, your router, and your internet provider all cache DNS records, so your browser may show the old site hours after the rest of the world sees the new one. Clear your browser cache, try a mobile connection, and use an online DNS checker rather than trusting one browser. If the checker shows the new IP worldwide, the move worked and your browser is simply showing a cached copy.
What Can Go Wrong
The most common failure is a migration that stops halfway. Large media libraries, oversized database tables, and slow shared servers all cause timeouts, and the plugin reports a partial copy that looks complete. The fix is to run the migration again, or to move the largest files by FTP and let the plugin handle the database. Always compare the post count, media count, and database size between the old site and the new copy before changing DNS.
The second failure is DNS impatience. Owners change DNS, see the old site in their browser, and change it back, which restarts the propagation window. Browsers and networks cache DNS records, so the site you see depends on where you check from. Use an online DNS checker to confirm the new IP is live worldwide, and wait a full day before judging the result. Editing content during the propagation window is the other half of this mistake, since edits on the old copy vanish when traffic moves.
The third failure is forgetting email and domain renewals, and it is the quietest failure in any guide to how to switch from hostgator to cloudways for wordpress hosting. A domain that expires during the move takes the site down no matter how good the hosting is, and an email mailbox that was never moved loses mail silently. Check the domain expiry date, the MX records, and the SSL certificate in the week after the move, and set calendar reminders for every renewal. The hosting move is only half the job, and the domain and email half is the part that causes quiet damage.
Choosing Between the Free Plugin and a Managed Migration
Cloudways offers two ways to move, and the right one depends on your time and your site. The free migrator plugin suits owners who are comfortable in the WordPress admin and have a standard site with no custom server setup. You install the plugin, enter the destination details, and watch the copy run. The plugin is free and unlimited for WordPress and WooCommerce, and most standard sites finish without help. It is the fastest route for a blog, a brochure site, or a small store.
A managed migration suits owners with a complex site or no time to spare. Cloudways engineers handle the move, contact you within 48 hours, and move the site for free on your first migration. That route fits stores with custom checkout flows, multisite installs, and sites with large databases that time out on a self service run. The trade off is waiting for the engineers, while the plugin route starts immediately. Either way, the migration costs nothing, so the choice is about your schedule rather than your budget.
One detail catches owners on both routes. The free plugin and the managed service move WordPress sites, and they do not move email, domain registration, or non WordPress applications. A site with a custom PHP app beside WordPress, or a mailbox hosted on HostGator, needs a separate plan for those parts. List everything that lives on the old host before choosing a route, and confirm each item has a destination. A migration that moves WordPress perfectly and loses email is not a successful migration.
The other detail is timing. The plugin route lets you migrate on a quiet evening and test the same night, while the managed route depends on engineer availability. A store that cannot afford downtime should migrate on a low traffic day, whichever route it picks, and should keep the old site live until the new copy is tested. Knowing how to switch from hostgator to cloudways for wordpress hosting means knowing which route fits your site, and the answer is usually the plugin for simple sites and the engineers for complex ones.
Speed and Performance After the Move
The performance gain is the reason most owners stay on Cloudways after the move, and it comes from dedicated resources rather than any single feature. A shared HostGator plan caps your site at 25 percent of one CPU core, so a busy hour slows every page. A Cloudways DigitalOcean server gives your site a full core and dedicated RAM, so the same traffic loads pages faster without any code changes. Owners typically notice the difference in the admin area first, where saving a post or loading the dashboard stops feeling slow.
Caching adds a second layer of speed. Cloudways bundles Varnish and Redis caching with the Breeze plugin, which serves cached pages quickly and stores database queries in memory. That stack matters for WooCommerce stores, where uncached pages are slow by nature, and for blogs with heavy themes. Install Breeze after the move, enable its caching and minification options, and test page speed before and after with a speed tool. A site that loaded in four seconds on shared hosting often loads in under two seconds on a cloud server with caching on.
Backups and staging add a third benefit that owners feel every week. Cloudways takes automated backups, so a bad plugin update can be rolled back in minutes instead of hours. Staging lets you test updates on a copy before pushing them live, which removes the fear that kept many owners from updating at all. Those two features change how a site is managed, since the owner stops treating every update as a risk. The move is not only about speed, since it also buys a safer way to run the site day to day.
Support is the benefit owners mention last and miss first when it is gone. Cloudways offers 24 hour human support through live chat, and its engineers handle server level problems that a shared host would blame on plugins. A site that goes down at midnight needs a person who can check the server, not a ticket queue that answers in the morning. That support is part of the monthly price, and it is one of the reasons the 11 dollar server feels different from a 3 dollar and 75 cent shared plan. When a store is down, the cost of slow support is measured in lost sales, not in hosting fees.
After the Move Checklist
Use this checklist in the week after cutover, and keep a copy in your site notes.
1. Confirm the live site loads on the real domain from two different networks. 2. Check the SSL certificate and fix any mixed content warnings. 3. Test the contact form, the checkout, and the admin login. 4. Confirm email sends and receives from the new provider. 5. Turn on automated backups and staging on Cloudways. 6. Install the Breeze caching plugin and check page speed. 7. Update the DNS TTL back to a normal value. 8. Cancel HostGator after one week and keep the old backup for a month.

Related Guides
Keep exploring with these guides on Stratilyze:
- Switch from Webflow to WordPress as a Small Business
- Switch from Squarespace to WordPress as a Small Business
- Switch From WordPress to Squarespace for a Small Business
Frequently Asked Questions
How long does it take to switch from HostGator to Cloudways?
A standard site takes a few hours from backup to a tested copy, plus a day for DNS propagation, which is the honest timeline for how to switch from hostgator to cloudways for wordpress hosting. Large sites with many images can take longer, since the migration run itself may need an hour or more. Plan a full day for the move and a week of monitoring after cutover, and do not change DNS until the migrated copy is fully tested on its temporary URL.
Will my site go down during the move?
No, not if you follow the steps in order. The old site stays live on HostGator while the copy is built and tested on Cloudways, and visitors only move when you change DNS. Downtime happens when owners change DNS before testing, or when they edit content on the old site after the copy was made. Keep the old site untouched during the propagation window and the move stays invisible to visitors.
Is the Cloudways migration really free?
Yes. The Cloudways WordPress Migrator plugin is free and unlimited for WordPress and WooCommerce sites, and the first managed migration by Cloudways engineers is free as well. HostGator charges 149 dollars and 99 cents per site for its own migration service, so the free plugin saves that fee. The only cost is the Cloudways server itself, which starts at 11 dollars a month.
What happens to my email when I leave HostGator?
Email does not move automatically, because Cloudways does not host email. Move your mailboxes to Google Workspace, Microsoft 365, or the Rackspace add-on before cancelling HostGator, and update the MX records at your registrar. Test sending and receiving from the new mailbox while the old one still works, since a missed MX record means lost mail.
Can I move back to HostGator if Cloudways does not suit me?
Yes. WordPress is portable, and the same migrator approach works in reverse, or you can restore the backup you took before the move. Cloudways bills pay as you go with no contract, so you can delete the server at any time. Keep the HostGator backup for a month after the move, so a return is a restore rather than a rebuild.
Which Cloudways server size should I choose?
Start with DigitalOcean Standard 1 GB at 11 dollars a month for a small site, and 2 GB at 24 dollars a month for a store or a busy blog. Pick a server location near your visitors, and scale up later without moving the site again. Check your current traffic and storage use on HostGator before choosing, since a site that already uses more than 25 GB of disk needs a larger plan.
A Final Word Before You Move
The move from HostGator to Cloudways is a straightforward project when it is done in order, and it pays for itself in the first month for most owners. Back up first, migrate with the free plugin, test the copy properly, and change DNS only when the new site is ready. Keep email and domain renewals in view, wait a week before cancelling the old plan, and keep the backup for a month. That sequence is the whole method for how to switch from hostgator to cloudways for wordpress hosting without losing a post, a sale, or an email.
The real lesson of this guide is that hosting is a monthly decision, not a lifetime one. A host that was right for a new site can become wrong as the site grows, and moving is cheaper than staying on a slow server with a renewal bill that keeps rising. Plan the move on a quiet day, follow the eight steps, and your site will be faster, cheaper, and easier to manage by the end of the week.